Ant Moats for Hummingbird Feeders: A Simple, Bird-Safe Fix
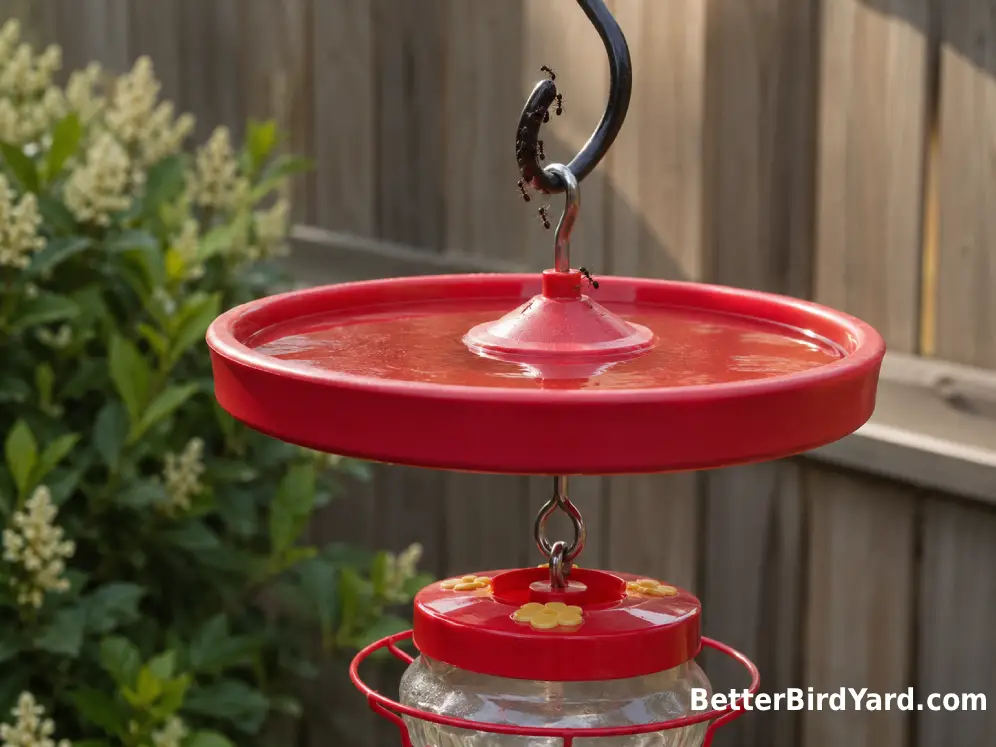
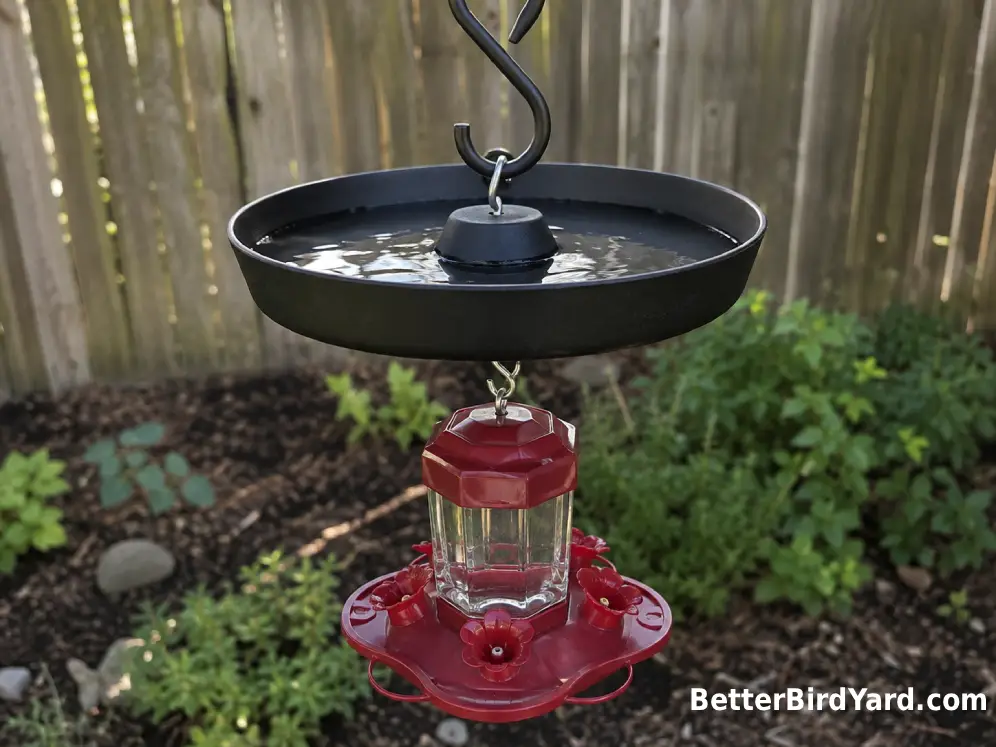
An ant moat for a hummingbird feeder is a small cup of water positioned between the feeder and its overhead hanger. Ants following the hanger toward the nectar encounter the water barrier before they reach the feeder.
This simple accessory is often the most practical answer to a persistent ant trail. It uses plain water rather than pesticides, sticky coatings, or oily substances that could get on a hummingbird’s feathers. Some saucer-style feeders include a built-in moat, while other feeders need a separate moat hung above them.
The setup is straightforward, but a few details make the difference between a moat that works and one that repeatedly dries out or gets bypassed. The feeder must hang below the moat, the water must surround the ants’ only route, and no feeder part should touch a wall, branch, railing, or plant stem. Cornell Lab guidance recommends water-filled ant moats and specifically advises against filling them with vegetable oil or petroleum jelly.
How Does an Ant Moat Stop Ants?
An ant moat interrupts the physical route ants use to reach the feeder. When ants climb down the hook or hanging wire, they reach a cup of water surrounding that route. They generally cannot continue across the open water to the feeder below.
There are two common designs:
- A built-in moat molded into the top or center of a hummingbird feeder.
- A separate hanging moat installed between the support hook and the feeder.
Built-in moats are especially common on saucer-style feeders. A separate moat can be added to many bottle, basin, and decorative feeders as long as the feeder hangs from a single overhead point. Cornell Lab notes that saucer feeders are also less likely to drip than many inverted bottle feeders, reducing the nectar spills that help ants discover a feeder.
A moat will not remove ants from the yard, and it does not need to. Its job is simply to keep them from reaching the nectar reservoir and feeding ports.
Where Should the Ant Moat Go?
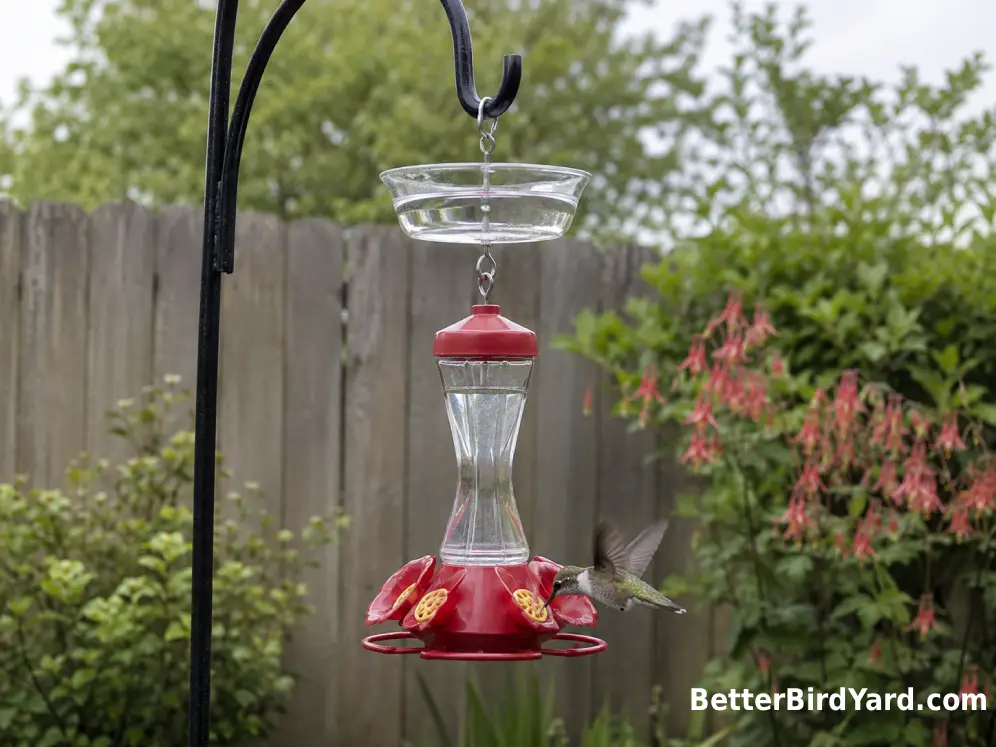
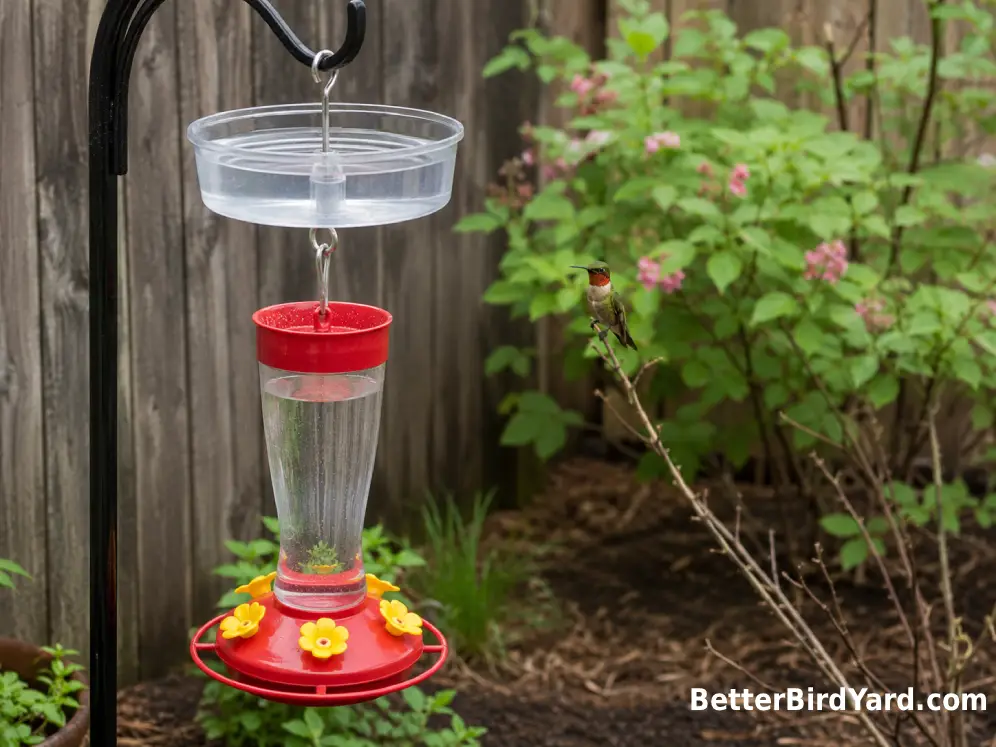
The moat belongs directly above the feeder. The correct hanging order is:
- Overhead support or feeder pole
- Upper hook
- Ant moat
- Lower hook
- Hummingbird feeder
This arrangement forces ants traveling from the support to encounter the moat. A moat hanging beside the feeder, below it, or from a separate branch will not block the route.
Check the entire setup from an ant’s point of view. A leaf touching the feeder lid, a vine resting against a feeding port, or a feeder swinging into a porch post can create a bridge around the moat. On a balcony or small patio, leave enough clearance for the feeder to move gently without contacting a railing, screen, wall, hanging basket, or outdoor furniture.
A simple metal rod or hook is usually easier to protect than a broad rope or a feeder suspended from several contact points. Cornell Lab recommends hanging the feeder from a simple rod and placing the ant trap between the feeder and the point from which it hangs.
What Makes the Best Ant Moat for a Hummingbird Feeder?
The best ant moat is not necessarily the most decorative model. It is the one that stays upright, holds enough water for your conditions, supports the feeder securely, and is easy to clean.
Look for these practical features:
- A cup deep enough that small amounts of evaporation do not leave it dry within a few hours.
- Secure upper and lower attachment points that do not bend under the feeder’s filled weight.
- A stable shape that hangs level instead of tipping and spilling.
- A smooth interior that can be rinsed and wiped without narrow crevices.
- Weather-resistant material without sharp edges or brittle-looking connections.
A larger water reservoir can be helpful in hot, dry, or windy locations, although it will also add weight to the hanging assembly. For a sheltered apartment patio, a compact moat may be sufficient if you can check it regularly.
If you are comparing an ant moat for a hummingbird feeder at Home Depot, a garden center, a birding store, or another retailer, ignore color and packaging at first. Check the hook arrangement, cup depth, feeder weight limit, and ease of cleaning. Store inventory and product designs vary, so examine the actual attachment points rather than relying only on a product photograph.
How to Install and Maintain an Ant Moat
Install the moat before ants establish a busy trail when possible. It is easier to block exploration than to manage a feeder that is already dripping and covered with ants.
- Inspect the feeder for cracks, loose ports, and sticky nectar on the outside.
- Hang the moat from the feeder pole, bracket, or overhead hook.
- Attach the feeder securely beneath the moat.
- Fill the moat with plain water, leaving enough space to prevent immediate spilling.
- Confirm that the feeder hangs freely without touching nearby surfaces or plants.
- Check the water level whenever you inspect or refill the feeder.
Replace the moat water when it becomes dirty, cloudy, or filled with leaves and insects. Rinse away debris that could form a bridge across the water. During hot or windy weather, check more frequently because a small moat can dry quickly.
Also wipe nectar from the feeder exterior and the surface below it. Audubon notes that wind, loose assembly, and dripping nectar make feeders easier for insects to find. Moving a leaky feeder to a calmer location and tightening its parts can reduce the attraction.
The moat is only one part of feeder care. Replace nectar before it becomes cloudy and clean the feeder thoroughly on a regular schedule, with more frequent attention in hot weather. Cornell Lab advises changing sugar water at least every three to five days, sooner during hot conditions, and cleaning hummingbird feeders at least weekly.
How to Make a DIY Ant Moat
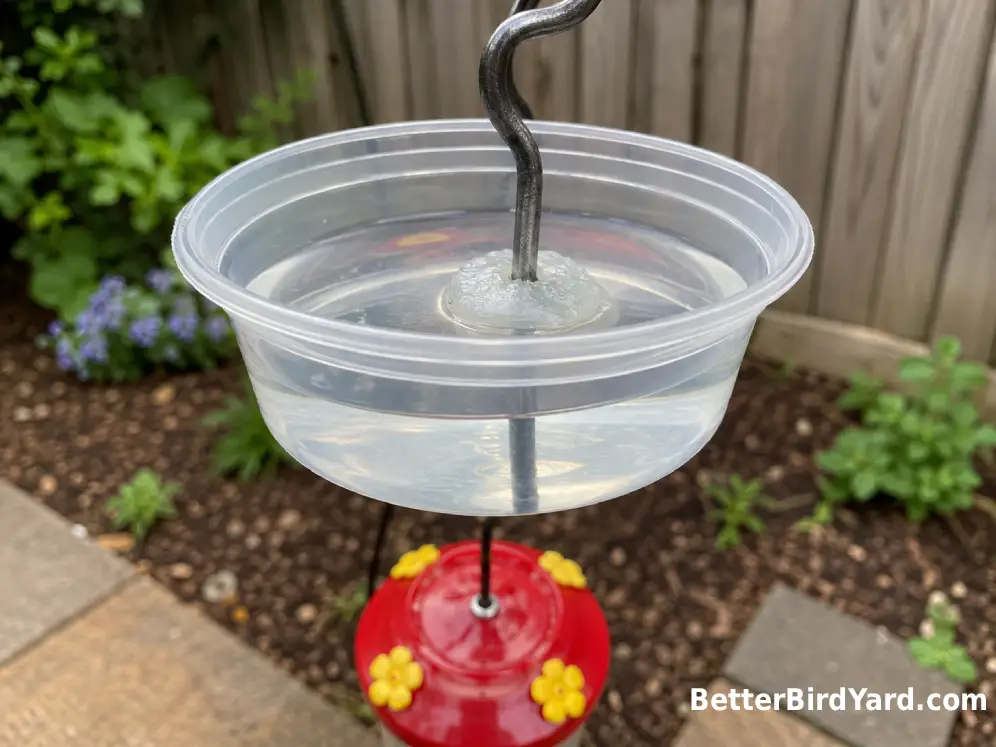
A do-it-yourself ant moat for a hummingbird feeder can work well when it creates the same basic water barrier as a commercial model. Cornell Lab suggests using a small plastic tub or similar cup, passing the hanger through a center hole, and sealing the opening so the container remains watertight.
You will need:
- A small, rigid plastic cup or deep cap
- A sturdy metal hanger or suitable upper and lower hooks
- A waterproof outdoor sealant appropriate for the materials
- A tool for making a neat center hole
Make the center opening only as large as needed for the hanger. Pass the hanger through the cup, seal the hole completely, and allow the sealant to cure according to its label. Fill the cup over a sink or outdoor work surface and leave it long enough to check for slow leaks.
Before adding the feeder, test the finished assembly with more weight than the empty feeder alone. The cup should remain level, and neither the plastic nor the hanger should flex noticeably. Do not hang a questionable DIY connection over a walkway, window, pet area, or frequently used seating space.
The important design detail is not the cup’s appearance. Water must fully surround the route ants follow down the hanger. If the hanger rests against the cup’s rim or another dry surface creates a bridge, ants may cross without entering the water.
Why Are Ants Still Reaching the Feeder?
When an ant moat appears ineffective, the problem is usually a dry moat, a physical bypass, or leaking nectar rather than the basic idea.
| What You Notice | Likely Cause | Practical Fix |
|---|---|---|
| The moat is empty by afternoon | Heat, wind, spilling, or a reservoir that is too small | Move it out of harsh sun, correct any tilt, check it more often, or use a larger moat |
| Ants never enter the moat | They have found another route | Move branches, vines, cords, or feeder parts away from nearby surfaces |
| Ants gather around feeding ports | Nectar is leaking or has been spilled | Tighten the feeder, clean its exterior, and consider a less breezy location |
| Ants cross the water | Leaves, dead insects, or debris have formed a bridge | Empty, rinse, and refill the moat with plain water |
| The moat hangs sideways | The hooks are off-center or the feeder is unbalanced | Reposition the connections or replace the unstable assembly |
Direct sunlight can also contribute to leaks in inverted bottle feeders. Cornell Lab explains that warming air inside a bottle-style feeder can expand and push nectar outward, while saucer feeders are generally less likely to drip.
If ants have already established a trail, clean the feeder exterior, hanger, pole, and any sticky surface using hot water where appropriate. Then relocate the feeder a short distance or interrupt every connecting route. Audubon also recommends keeping the feeder tidy and moving it when persistent insects continue finding it.
Use Only Bird-Safe Ant Control Around the Feeder
Fill the moat with plain water only. Do not use vegetable oil, petroleum jelly, grease, or another sticky coating on the moat, hanger, pole, or feeder. Cornell Lab warns that greasy substances can mat a bird’s feathers, while water provides the needed barrier without that risk. Sticky materials near feeding ports can also contaminate nectar.
Avoid spraying insecticides on or around a hummingbird feeder. Audubon recommends maintaining an insecticide-free yard because pesticides can harm birds, bees, and other animals. Hummingbirds also consume small arthropods as part of their natural diet, so reducing broad pesticide use supports more than nectar feeding alone.
If you only change one thing, start by stopping nectar leaks. A clean, securely assembled feeder is less likely to create the sticky scent trail that attracts ants in the first place.
Continue using safe nectar practices as well. Prepare nectar with plain white granulated sugar and water, without honey, artificial sweeteners, or red dye. See our hummingbird nectar recipe and hummingbird feeder cleaning guide for the full routine. Audubon and Cornell Lab both emphasize fresh nectar, regular cleaning, and more frequent maintenance during hot weather.
Is an Ant Moat Worth Adding?
For most hanging hummingbird feeders, an ant moat is a useful, inexpensive addition. It creates a simple barrier with plain water and requires little maintenance beyond refilling, rinsing, and checking that ants have not found another route.
Choose a stable moat with secure connections and enough water capacity for your weather. Hang it directly above the feeder, keep every other surface out of contact, and correct nectar leaks promptly. A DIY ant moat can work just as well when its cup is watertight and its hanger safely supports the filled feeder.
The moat will not compensate for cloudy nectar, a dirty feeder, or a feeder that continually drips. Treat it as one part of a larger routine: fresh nectar, clean ports, a secure hanging location, and regular observation. With those basics in place, a water-filled ant moat is usually the calmest and most bird-conscious way to keep ants away from hummingbird nectar.